Page 1 of 3
Starter Solenoid Help
Posted: Mon Jan 01, 2018 3:42 pm
by papasmurf
Tried to fit our hosts "better" solenoid today to the Electra X (ish) Upon close inspection the old one was fubarred.
I am getting into a wucking fuddle fitting the new one, (blown two 30 amp fuses.)
Has anyone got a decent wiring diagram? (No problem with the two marge wires the M and B on the new solenoid is a bit of a clue.
I suspect just connecting the two thin wires to the existing wiring is the problem.
Our hosts state some rewiring is necessary but they don't specify what.
Starter Solenoid Help
Posted: Mon Jan 01, 2018 4:51 pm
by papasmurf
Starter Solenoid Help
Posted: Mon Jan 01, 2018 6:00 pm
by Adam
Hi. I have an Electra X on which the solenoid energizing and earth cables come out of the solenoid body as a pair to a green plug (about 100mm of cable). I would suggest that with your new solenoid on the bench you secure a continuity meter across the terminals M and B and there should be no reading. Then with the meter still connected put battery power (Pos or Neg, doesn’t matter which) to one of the energising coil connectors and flash t’other side of the battery to t’other terminal. You should hear the solenoid engage with a click and continuity meter should give strong reading, disconnect battery and continuity meter. That proves that the solenoid is engaging correctly. I suspect the 30-amp fuse and related ¼†spades are there for stuff fitted to later machines and superfluous to your needs. All you need is the solenoid part so pull out the fuse and put it in the little box on your top shelf marked ‘spare fuses’. From your old solenoid cut the two wires complete with their shared green plug, crimp appropriate female connectors to each wire and fit to your shiny new energising coil connectors. Re-fit solenoid to your machine and wire up just as it was before, ignore the 1/4" spades, should be fine. M and B are self-explanatory. Good luck. Happy Hew Year.
Starter Solenoid Help
Posted: Mon Jan 01, 2018 6:31 pm
by papasmurf
Cheers for that, there is however just one small problem with cutting the wire of off the old solenoid, it is not possible to see which wire is which.
I will test the solenoid tomorrow.
Starter Solenoid Help
Posted: Mon Jan 01, 2018 6:59 pm
by Tim NZ
Give some thought to WHY the sol failed?
Typically is is from moisture trapped inside the unit, due mostly to the fact that when any water does get in, it can not drain out.
I mount the replacements sol v/v so that the sealed cover is upmost, terminals facing down so water can not accumulate.
Fun when the solenoid fails with the contacts stuck/welded closed...
Starter Solenoid Help
Posted: Mon Jan 01, 2018 7:22 pm
by papasmurf
Tim NZ, it was very obvious why the original solenoid failed, one of the main terminals was loose in the solenoid.
No sign of corrosion just a cheap and nasty solenoid.
Starter Solenoid Help
Posted: Mon Jan 01, 2018 8:05 pm
by Alan R
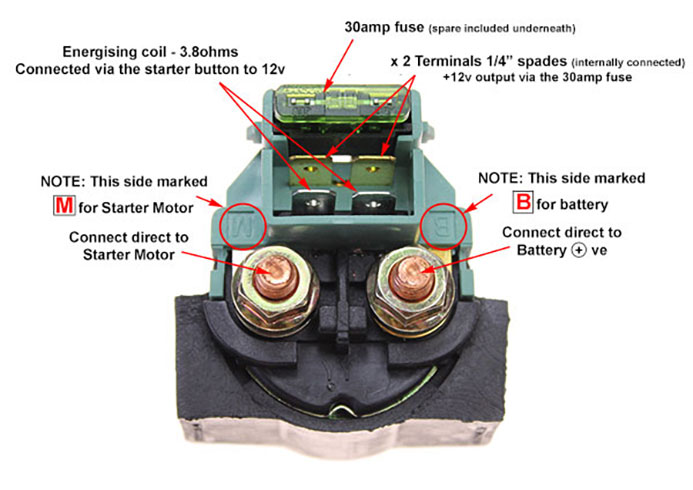
Hi Guys--------Papasmurf, before you cut anything on the Electra try this}-------1st)... as per that photo, put a piece of tape over the fuse holder and the two spade connectors below it such that you can't see them !!!.....Now what you see left is all that you need to concentrate on...ie the two large nuts and the two spade terminals immediately above them..........2nd)..On the old solenoid, where you have the two thin wires going to that green connector, connect one test meter wire to either of those two wires and the other test meter wire to EARTH ( Ideally the battery NEGATIVE terminal)_........Turn the ignition to ON then turn the key and hold it in the START position.......If the test meter needle deflects to 12v then that is your feed wire from the ign key.........Now go through the same procedure but with the other thin lead....This time you should NOT get a needle deflection because this is the earth wire...
Having said all that it shouldn't matter which way around you connect a solenoid as it's a DC INDUCTIVE device and so is not polarity conscious, but there may be internal wiring that requires it to be connected in one particular way only.....What we need is the wiring diagram for your particular model........
Starter Solenoid Help
Posted: Mon Jan 01, 2018 8:19 pm
by papasmurf
Alan R, it is no problem at all to remove the two spade connectors and the fuse. (They are clipped on as a unit which comes off easily when the two nuts are rewmoved.
As for an accurate wiring diagram for my particular model it does not exist it was assembled in a shed in Oxfordshire out of spare parts.
I expect after testing the new solenoid I will have to do a rewire of the two thin wire along their entire length.
I assume the thin one related to the B terminal can be directly connected to the positive on the battery.
Starter Solenoid Help
Posted: Tue Jan 02, 2018 12:51 pm
by papasmurf
Thanks for all the suggestions. I can't get to touch the bike until next week due to very nasty weather locally over the next two days, after that a trip upcountry in the tin box to a 70th birthday party and onwards see some relatives. (Whether I like it or not.
Starter Solenoid Help
Posted: Tue Jan 02, 2018 9:05 pm
by Kentish Man
Papasmurf, why not leave the solenoid as is, make up a short cable (approx. 2" long), on one end crimp on a ring terminal, and the other end a female insulated terminal. Fit the ring terminal to the "B" battery terminal, the other end to the right hand 30A terminal. (You will have already connected the solenoid coil connections.)
Now you have a fused output that can be used for an accessory, i.e. heated handlebar grips. Just plug into the spare terminal.
Note: this will be permanently "live" regardless of ignition key.
Hope this helps.
Ex Man of Kent now Kentish Man!